Starting iPhone development as an Android developer
Introduction
A while ago I posted an article about starting Android development as a Java developer.
I am posting a similar article about iPhone development now, and I thought it would be more useful if it would be written from the specific point of view of an Android developer.
First we are going to talk about objective-C – the language in which iPhone apps are developed -, explain how to unit test objective-C code and discuss the main obstacle to start using it when coming from a Java background: manual memory management
Then we create a simple iPhone app: we talk about the iPhone equivalents for the layout xmls, Activity class and Application class in Android.
We end by mentioning that the ui design of an iPhone app is very different from an Android app, and when porting from Android to iPhone, that this is actually one of the bigger difficulties.
This article is aimed at people who know Java, have a decent background in programming languages and have a Mac available they can install the development environment for iOS – XCode and Interface Builder – on. XCode and interface builder are not installable on Windows and Linux operating systems.
Learning Objective-C
Objective-C is nothing more than C augmented with object oriented capabilities. Although at first it sounds like you will have to spend a lot of time learning C, this is not the case. You will need some background, but everything in objective-C is Java like. Low level C details are hidden. To learn Objective-C thoroughly, I’d recommend reading “Learn Objective-C for Java developers“.
If we have a Java class like:
public class Store {

	private List products;
	private String name;
	private boolean open;

	public List getProducts() {
		return products;
	}
	public void setProducts(List products) {
		this.products = products;
	}
	public String getName() {
		return name;
	}
	public void setName(String name) {
		this.name = name;
	}
	public boolean isOpen() {
		return open;
	}
	public void setOpen(boolean open) {
		this.open = open;
	}
	public List getProductNames(){
		List productNames = new ArrayList();
		for (Product product: products){
			productNames.add(product.getName());
		}
		return productNames;
	}
}
Then the corresponding objective-C class would be divided into the following two files:
Store.h:
#import <Foundation/Foundation.h>

@interface Store : NSObject {
	NSArray *products;
	NSString *name;
	BOOL open;
}

@property (nonatomic, retain) NSArray *products;
@property (nonatomic, retain) NSString *name;
@property BOOL open;

- (NSArray *) getProductNames;

@end
Store.m:
#import "Store.h"
#import "Product.h"

@implementation Store

@synthesize products;
@synthesize name;
@synthesize open;

- (NSArray *) getProductNames{
	NSArray *productNames = [NSMutableArray new];
	for (Product *product: products){
		[productNames addObject: product.name];
	}
	return productNames;
}

- (id) init {
	self = [super init];
	if (self!=nil) {
		products = [NSMutableArray new];
	}
	return (self);
}

- (void) dealloc{
	[products release];
	[name release];
}

@end
The first being the interface definition and the second being the implementation.
Although the syntax looks different between Java and objective-C, there is basically a one-to-one mapping to everything in there.
The only difference being the implemented dealloc method, to which we will get to soon, and indicates that for iPhone apps, we will have to manage our memory manually.
The interface definition
In the interface definition we declare our Store class as a subclass of NSObject, basically the equivalent of the java.lang.Object class. Then we declare our fields. Notice that we are declaring pointers to objects instead of to the objects itself(notice the use of the * symbol – once declared, however, the * symbol is not used anymore, but we are working with the pointer!). This is only the case for objects, not primitives, like BOOL, or int. Anyway, if you use the objects the standard way, you can just treat them as in Java.
After the fields definition, we declare our properties with the @property attribute. Notice that for the objects, we declare (nonatomic, retain). nonatomic means that the property(the getter and setter for the field) does not have to be threadsafe. retain comes down to keeping the object until release is explicitly called. (nonatomic, retain) is what you will use for all your properties if you want to have Java-like behavior. So, although you definitely should read about it, for the purpose of this article you can just take (nonatomic, retain) as is.
Then we define one instance method(indicated by the -, + would indicate a class method) to get the names of all products.
The implementation
In the implementation file, we synthesize our properties. While the @property only indicated that we were going to implement the property(the getter and setter), the @synthesize directive actually generates these methods for us, without us having to declare them explicitly.
Then we implement our method getProductNames. Notice how method calls(well, in objective-C terminology messages) are put between square brackets. [NSMutableArray new] means the class method new is called on the NSMutableArray class. [productNames addObject: product.name] calls addObject on the productNames instance and passes the product.name as a parameter. Note that point notation(product.name) is a special (Java like) notation for properties, made possible through the @property directive.
Then we implement init – which is the constructor – and we also implement dealloc, which we will discuss later: this method releases the retained objects.
Installing XCode and creating a Project
Talking about XCode: if you havent already done so, this is a good time to install XCode.
XCode is the development environment for Mac and iOS(the iPhone operating system) software. It is the equivalent of Eclipse(or any other Java IDE) for Android developers.
To get it, you will need to register at developer.apple.com and download it at the Apple Dev Center.
Once installed, fire it up and choose “Create a New XCode Project”. On the left hand side select “iOS – application”, on the right hand side “the View-Based application template”, click “Choose” and give your project a name.
The most used part of “Groups and Files” is the section right under the project name. You will see the folders “Classes” and “Resources” there. In Classes our classes are placed, in Resources our resources are placed, like our application info file(the AndroidManifest.xml equivalent) and our user interface files(the Android layout xmls equivalents). Note that these folders are grouping folders within XCode. They do not correspond to actual folders on the file system! If you would create a new Group “images” under Resources and put an image “products.png” there, you would still reference it as “products.png” in the app, not as “images/products.png”.
Create a new Group “Model” under Classes and create the previous Store class and the following Product class in this new folder(New File>Cocoa Class>Objective-C Class):
Product.h:
#import <Foundation/Foundation.h>

@interface Product : NSObject {
	NSString *name;
}
@property (nonatomic, retain) NSString *name;
@end
Product.m:
#import "Product.h"

@implementation Product

@synthesize name;

@end
Unit testing our code
Something most objective-C/iPhone development books dont mention is how to write unit tests in XCode.
Coming from a Java background however, being used to unit test everything, you really want to write unit tests.
Also, to learn a new language, getting your unit tests up and running is probably the fastest way to execute some piece of code and see what happens.
Luckily, the latest versions of XCode have unit test support builtin. To be able to run unit tests, we will need to add a unit test bundle target to the project.
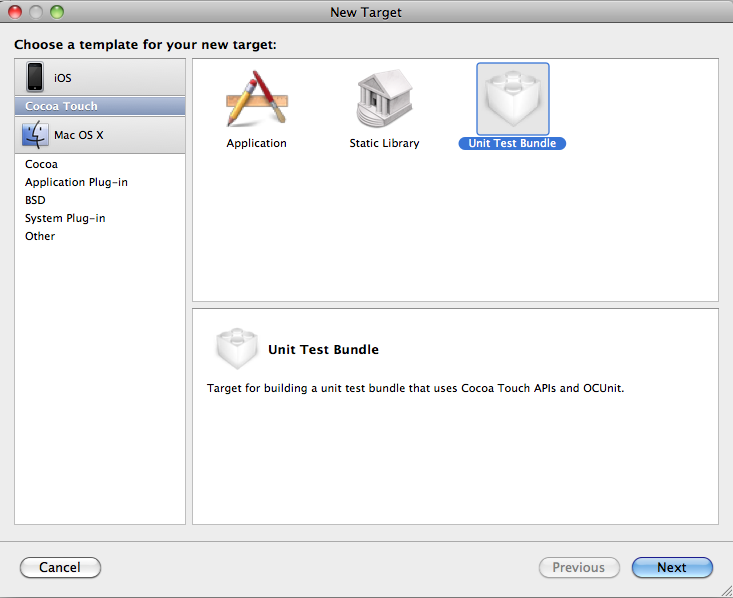
From the project root right click menu, choose Add>New Target and then “iOS>Cocoa Touch>Unit Test Bundle”.
Next, create a new group called “Unit Tests” under “Classes”.
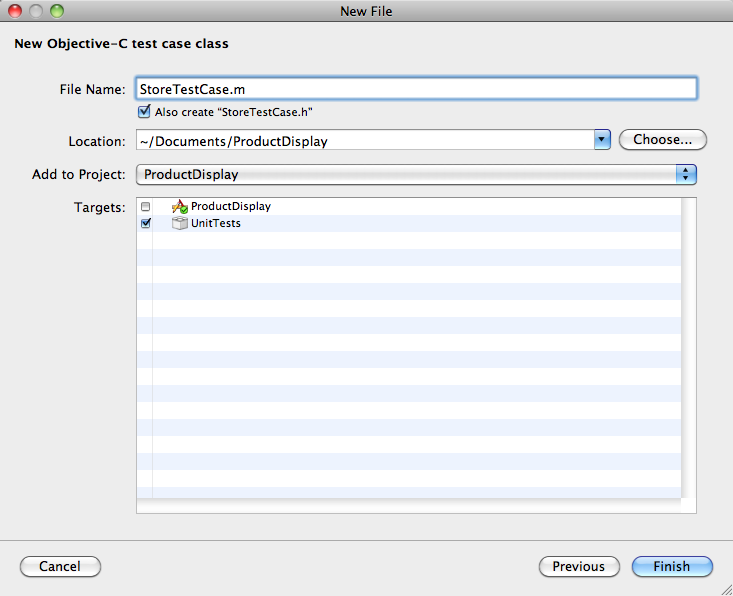
Then create a unit test by choosing New File>Cocoa class>Objective-C Test Class. Note that you could also choose New File>Cocoa Touch class>Objective-C Test Class, but then our unit test would be supplied with stub methods for specific testing on touch devices. Since, we are only going to unit test our model classes now, we dont need those.
Give it the name StoreTestCase – by convention names of unit tests should end with “TestCase” – and make sure you unmark the main iOS target and check the UnitTests test bundle as a target. You dont want the unit test to end up in your actual iPhone app and you want it to run when the test bundle is run.
Now, change the content of the StoreTestCase.m file to:
@implementation StoreTestCase

-(void) testGetProductNames{
	Store *store = [Store new];
	Product *product = [Product new];
	product.name = @"Dvds";
	[store.products addObject: product];
	NSArray *productNames = [store getProductNames];

	STAssertEquals([NSNumber numberWithInt:[productNames count]],
                   [NSNumber numberWithInt:1],
                   @"FAILURE");

	STAssertEquals([productNames objectAtIndex: 0],
                   @"Dvds",
                   @"FAILURE");
}

@end
In this test, we are creating a store with one product: dvds.
In the last two lines, we first check whether the getProductNames method returns an array with 1 element for the above case, and then we check that the value of this one element is “Dvds”.
Notice that in objective-C, String literals are prefixed with the @ sign.
To run this test, right click on Targets>UnitTests in XCode and choose “Build UnitTests”. Before you do that, make sure Store.m and Product.m are added to the UnitTest target as well, or the test wont find the Product and Store classes. You can add these files to the UnitTests target by rightclicking on the file, clicking Get Info, selecting the Targets tab and then check the UnitTests target as well.
When “Build UnitTest” is run, the build should succeed, which indicates that the test ran succesfully.
Now we are going to make the test fail. In the Store.m implementation, change the [NSMutableArray new] declaration into [NSArray new].
The array wont be mutable anymore, wont be able to respond to the addObject message and hence the test should fail now.
And indeed, when run we see the following when we take a look at the Build Results:
Logging
The equivalent of both Java log.debug/info/error and system.out.println in objective-c is NSLog(@”%@”,@”printSomething”). Note that, since it can only be used to print variables, you always have to put the second argument there, even if it is a string literal. The second argument will be inserted at the %@ spot in the first argument.
XCode usage
In XCode, I am missing Eclipse like features like setter/getter generation, automatic organization of imports and automatic override/implementation of methods/interfaces. It is possible to define macros who do this kind of work, but it is hard for a beginner to figure out how to add these. I really think XCode should ship with features like these that assume sensible defaults(since there are a lot less assumptions that can be made compared to Java – for example, it is possible to define 5 classes in some file that isnt even named after any of the 5 – one could argue that a feature like this shouldnt be included but I dont agree).
The Code Sense of XCode is nice though – the automatic completion is very user friendly and for a full list of options, you can just press F5.
Another tip: when you hold option() and doubleclick on a class you will see the short help, from which you can directly go to the api documentation – very useful if you are just starting to get to know the available methods of the framework classes.
Memory management
So far, we’ve said that objective-C and Java are very much a like in concepts and mappings, and ports are pretty straightforward.
There is only one catch though. Although objective-c supports garbage collection, it is not available on iOS devices, which means that we will have to manage our memory manually.
This is something Java developers are not used too.
In essence, it is really easy, but still, in the beginning I regularly had leaks reported by the Allocations and Leaks instruments.
The basic rule is that if you alloc something, you have to release it(which means calling release on the object). Note that the new method of a class is a short cut for [[-Class- alloc] init], so if you call new, you will need to release as well.
Only if you call some framework methods, for example when doing a [NSString string] call, there is no need to call release because the returned NSString is autoreleased.
Although the rule is easy, it is easy to overlook something.
Like, in the above unit test, we not only have to release the store and product instances, but we have to release the productNames array as well, although it was not created in the code snippet itself, but when the getProductNames method of the store instance was called.
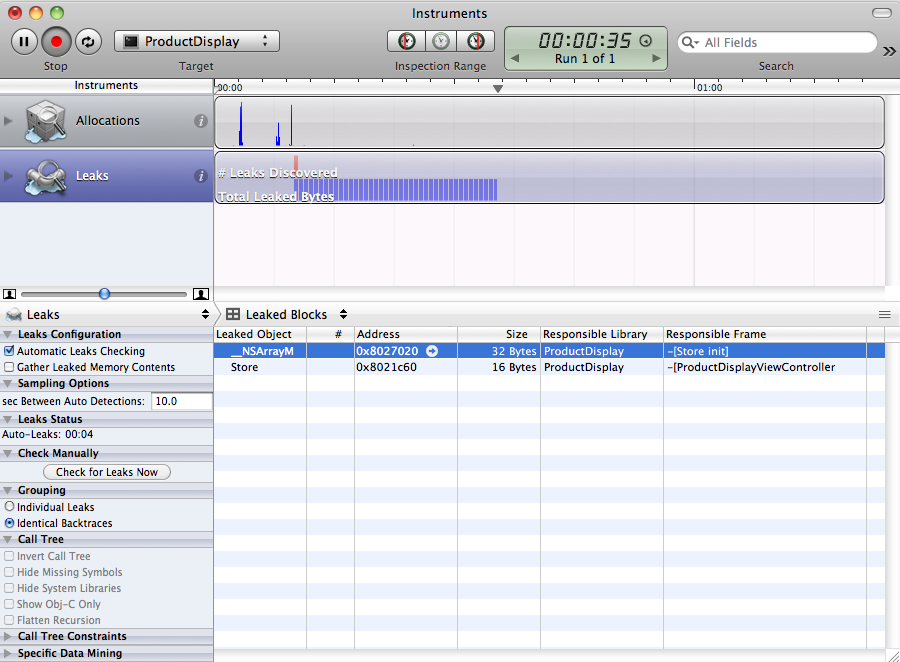
Luckily, there are tools available to detect memory leaks. Instead of just running your application – ours will still just render an app with an empty screen -, you can choose Run>Run with Performance Tool>Leaks from within XCode. For iOS apps, this will run the application in the iPhone simulator, while meanwhile, leaks are reported in the Leaks tool, like in the following screenshot:
which makes it a lot easier to test your app on memory leaks, find them and remove them.
Android app development vs iPhone app development
Let us take a look at the files now that are already present in the project we created before. In the Classes folder there are already two classes defined: an AppDelegate and a ViewController. In the Resources folder there are two xib files: MainWindow and one with the same name as our UIViewController. There is also a plist, which is roughly the equivalent of the AndroidManifest.xml file on Android, in which the application icon, name and bundle are defined.
AppDelegate – the equivalent of the Android Application
Just like in Android, there is a class that represents the application as a whole: the AppDelegate. This is a good point for application initialization, such as creating or updating a database, and setting shared preferences. Note that in Android, unless a custom Application class is specified in the AndroidManifest.xml file, the default Application class is used, and the project will not contain an own implementation of this class. For iOS apps, however, there will always be a custom implementation.
UIViewController – the equivalent of the Android Activity
Just like in Android, an iPhone application is divided into one or more focused things a user can do. On Android, each of these things would be implemented as an Activity. For every view one activity. On iPhone, each of these things would be implemented as a UIViewController. Similar to the Activity class, the UIViewController class has lifecycle methods that can be overridden to do something when the activity is started, stopped, comes into view, disappears from view, etc..
Let’s declare the interface of our controller as follows:
#import <UIKit/UIKit.h>
#import "Store.h"

@interface ProductDisplayViewController : UIViewController {
	Store *store;
	UILabel *storeNameLabel;
	UITextField *newNameTextField;
}

@property (nonatomic, retain) Store *store;

@property (nonatomic, retain) IBOutlet UILabel *storeNameLabel;
@property (nonatomic, retain) IBOutlet UITextField *newNameTextField;

- (IBAction) changeStoreName;

@end
and implement it like:
#import "ProductDisplayViewController.h"
#import "Store.h"

@implementation ProductDisplayViewController

@synthesize store;
@synthesize storeNameLabel;
@synthesize newNameTextField;

- (void)viewDidLoad {
	store = [Store new];
	store.name = @"Integrating Stuff Store";

	storeNameLabel.text = store.name;

        [super viewDidLoad];
}

- (void)viewDidUnload {
	self.storeNameLabel = nil;
	self.newNameTextField = nil;
	[super viewDidUnload];
}

- (void)dealloc {
	[store release];
	[storeNameLabel release];
	[newNameTextField release];
    [super dealloc];
}

- (IBAction) changeStoreName {
	//store = [Store new];	//uncomment to cause a memory leak
	store.name = newNameTextField.text;
	storeNameLabel.text = store.name;
}

@end
In the interface, the important thing to notice is the use of IBOutlet and IBAction. In the next section, we will discuss Interface Builder(IB), and these marker keywords tell Interface Builder that both the 2 properties as well as the method are available for linking. IBOutlet means that this property can be linked to an interface element within Interface Builder – which will be a textfield and a label in our case. IBAction means that the method can be used as an event – on a button click in our case. We will show this in action in the next section.
xib files – the equivalent of the Android layout xml files
Although it is – just like in Android – possible to declare the user interfaces programmatically, this approach is very uncommon, and usually user interfaces are build within Interface Builder and saved as xib files. Double click on the xib file with the same name as your UIViewController. Interface Builder will open.
Play a bit with the Library, and add some labels, a rounded rect button and a text field, like this:
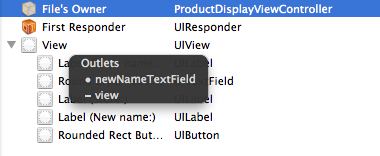
Our interface is now ready. The only thing left to do to finish our sample app is to connect the interface elements we used in Interface Builder with our two properties and our action in our XCode code. In Interface Builder, in the main view, hold down ctrl and click and drag from File’s Owner to the UITextField. It will then let you choose between the available outlets of this type: in our case only newNameTextField is available.
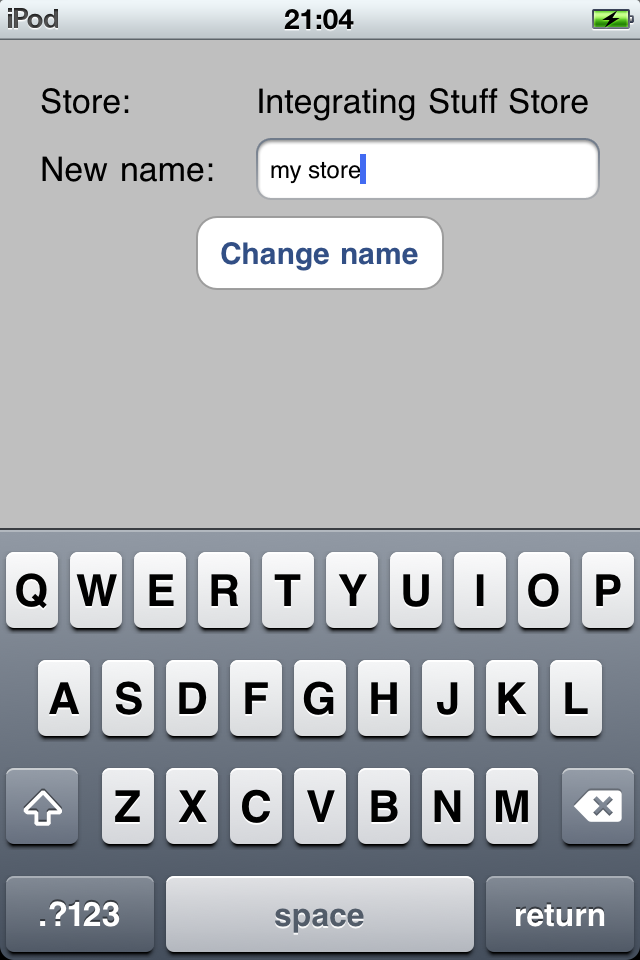
Then do the same for the label. Control-drag from File’s Owner to the “Store name will come here” label and select the single option: storeNameLabel. Then, control-drag from the rounded rect button to file’s owner and select the changeStoreName action. This links a click on the button to our action. Our app is now finished and we can run it. Choose Build and Run in XCode from the run menu and take a look at the screenshot:
Android UI design vs iPhone UI design
When creating my first iPhone app, the one thing I struggled most with was the UI design.
This is because there are more easy to use and more interface elements available for Android.
Switch instead of checkbox
There is no checkbox available.
Instead of a checkbox, there is an on/off switch available:
But it is not possible to put two next to each other on one line, because they take so much space and the on/off semantics do not agree with all use cases.
No radiobuttons
Radiobuttons are just not available for iOS. The alternative is to use a UIPicker or a UITableview in which only one item can be selected.
Huge picker instead of dropbox
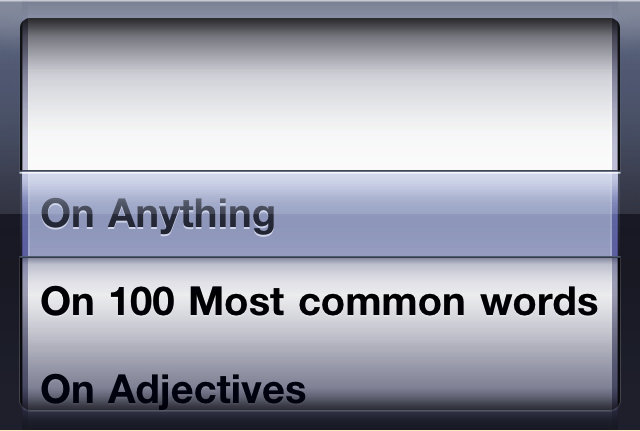
Because an application I had to port made extensive use of dropdown lists(Andoid Pickers), which are a lot smaller than their iPhone UIPicker equivalents, it was quite hard to come up with a decent user interface(without resorting to scrollviews, which would have broken the flow of the app). The main hurdle came from the fact that it is impossible to change the height of a UIPicker. They are huge:
The strange thing is that in application preferences, you can use PSMultiValueSpecifier, which looks like:
And which would have been the exact thing I was looking for. It is not in the development kit, however. I really wonder why they do not offer it as an alternative to the picker. My guess is that they want to force developers in using UIPickers as much as possible. In case that the user usually leaves the default value and only uses the values from the list from time to time, it would be nice to have an interface element like the PSMultiValueSpecifier out of the box though.





 In this blog, Steffen Luypaert gives tutorials on how to integrate Java frameworks and third-party APIs with each other.
Great read! Good starting point for any Android developer out there considering porting apps to iPhone.