Getting started with Android, its location services and its Google Maps add-on
Introduction
In this article I will first say something about Android in general.
After that, we will write an Android application from scratch that pinpoints the location of the user using the Android Location Services, gets a list of parties near that location, and then displays those both as a list as on the map, using the Google Maps Android add-on.
Although good Android tutorials about all subjects covered can be found elsewhere, the added value of this article is probably that it takes you from nowhere to being able to implement a popular Android application type. No prior Android knowledge is required.
Android
Since handhelds are the new pcs, as a software developer you should probably be at least a little bit aware of whats going on in handheld land.
Mobile phones use a variety of operating systems such as Symbian OS, Microsoft Windows Mobile and iPhone OS. Android is one of those. Android is the mobile phone operating system which was first developed by Google and later by the Open Handset Alliance. The list of Open Handset Alliance members is pretty impressive, including T-Mobile, Motorola, Samsung, Sony Ericsson, Toshiba and Vodafone, amongst Google and many well-known others.
It is hard to say which mobile OS is going to stay and which is not in the long run. The biggest ones are probably going to stay for a little while longer, and especially iPhone OS and Android are definitely not going anywhere anytime soon. Given their popularity and investments by their backing companies, many people expect these two to become the biggest players on the market.
Luckily, as a Java developer, you dont have to invest a lot of time to get started with Android anyway. Pretty much the entire regular JDK can be used for it(except for AWT/Swing: Android has its own ui classes, which are usually defined in an xml file). Apps dont need to get signed or anything either, so they are ready for Android powered devices right away.
The Android SDK and the Java Micro Edition are two different things. The Android SDK is linked to the Android OS while J2ME runs on top of most major mobile phone Oses(all, except on nonjailbreaked iPhones, as far as I know). Working with J2ME seems to be a lot more tedious though, and it is not as easy to work with all the services the OS provides.
Getting started with Android
This tutorial assumes that you are a Java developer working with the Eclipse IDE.
Since there is plenty of getting started information on Android(check Android Developers Tutorials, especially Hello World and Hello Views), I will try to keep this section as short as possible, and progress to the interesting part, namely using the Google Maps addon and the location services, as quickly as possible.
Setting up Android for Eclipse
First, you need to download the android sdk at http://developer.android.com/sdk and extract it to your hard drive. Setting everything up is properly described there, but I add it here as well for clarity.
Set up the remote update site https://dl-ssl.google.com/android/eclipse/ in Eclipse and install the Android Development Tools plugin.
Restart Eclipse and point Eclipse to the extracted Android SDK in “Android” preferences.
In Eclipse, go to Window -> Android SDK and AVD Manager, and install the latest Platform. For this tutorial, you will need to install the Google APIs too.
Making the project
In Eclipse, choose File > New > Project (> Android) > Android Project.
You will be shown a dialog, in which you will need to enter the project name, together with the following things:
- The build target: for the purpose of this tutorial, you will need to select Android + Google APIs as the build target. If you only select Android, the Google API specific classes wont be found and the code wont compile.
- The following properties:
The application name: name of the application, as shown to the user in Android.
Package name: package under which your code will reside.
Create Activity: if you choose to do this, a subclass of Android’s Activity class will be generated and serve as the activity from which your application will start. More about activities below.
Setting up a virtual device and running the generated project
Once this is done, the generated project can already be run.
Before we can do this, we need to setup a virtual device though, to emulate the behavior of an android powered device.
Go to Window > Android SDK and AVD Manager, and in the Virtual Devices tab, choose new. Add a name, like MyVirtualDevice, and choose Google APIs again as the build target. The other fields can be left blank.
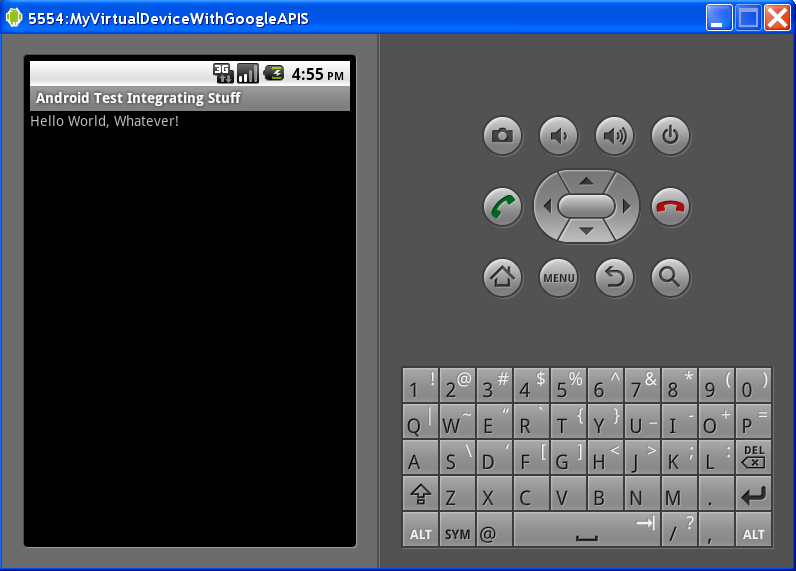
Select the root of the project and choose Run > Run > Android Application in Eclipse. The emulator should be launched and if everything went well, you should see something like the following:
Note that it might be necessary to unlock the emulated device first before the app will be shown.
Activities and views
Basically, every Android app consists of 1 or more Activity classes. In the Hello World we just saw, the Activity class does not do anything. It only sets its view, which causes us to see the displayed text.
public void onCreate(Bundle savedInstanceState) {
        super.onCreate(savedInstanceState);
        setContentView(R.layout.main);
}
The view/layout itself is described in an xml file. Actually, R is an autogenerated java class which is directly produced by the layout xml files. R.layout.main is basically a pointer to the view defined in the main.xml in the (res/)layout folder:
<LinearLayout xmlns:android="http://schemas.android.com/apk/res/android"
    android:orientation="vertical"
    android:layout_width="fill_parent"
    android:layout_height="fill_parent">
<TextView
    android:layout_width="fill_parent"
    android:layout_height="wrap_content"
    android:text="@string/hello"/>
</LinearLayout>
This file defines a LinearLayout with one element: a TextView of which the text is set to @string/hello, which in turn is a lookup for the string hello defined in the (res/)values/strings.xml file.
Note that we could have done the exact same thing using Java code, bypassing the xml files.
public void onCreate(Bundle savedInstanceState) {
        super.onCreate(savedInstanceState);
        TextView textview = new TextView(this);
        textview.setText("Hello World, Whatever!");
        setContentView(textview);
}
Of course, seperating your view from your model is always a good idea, and defining your layout in xmls is the recommended approach.
A tabbed menu
What we are going to do now, is based on the Hello Views Tutorials. Although we are doing one kind of popular navigation here, tutorials for many other kinds of views can be found there.
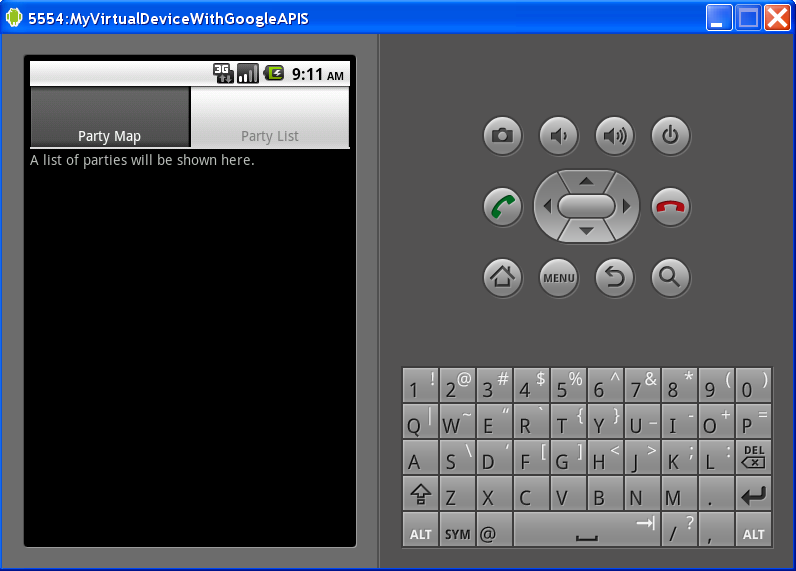
We are going to seperate the view of our main activity in two parts: a tabbed menu on top of the window, and for every menu element, a content window below this menu.
First, we define two new Activities: the classes PartyMapActivity and PartyListActivity, which should both extend the Actvity class and which we can keep empty for now. If you want, you can make a TextView in code as in the example above though.
You also have to let Android know about the new activities by adding the two activities to the AndroidManifest.xml file in the project root, under the application element:
<activity android:name=".PartyListActivity" android:label="party list"/>
<activity android:name=".PartyMapActivity" android:label="map"/>
We will be using the following layout, which defines our tabbed menu and the container in which we will put the tabcontent:
<TabHost xmlns:android="http://schemas.android.com/apk/res/android" android:id="@android:id/tabhost"
	android:layout_width="fill_parent" android:layout_height="fill_parent">
    <LinearLayout android:orientation="vertical"
    	android:layout_width="fill_parent" android:layout_height="fill_parent">
        <TabWidget android:id="@android:id/tabs"
        	android:layout_width="fill_parent" android:layout_height="wrap_content" />
        <FrameLayout android:id="@android:id/tabcontent"
            android:layout_width="fill_parent" android:layout_height="fill_parent">
        </FrameLayout>
    </LinearLayout>
</TabHost>
We then define the tabs in our main activity:
public class Whatever extends TabActivity {

    @Override
    public void onCreate(Bundle savedInstanceState) {
        super.onCreate(savedInstanceState);
        setContentView(R.layout.main);

        TabHost tabHost = getTabHost();

        Intent mapIntent = new Intent().setClass(this, PartyMapActivity.class);
        TabHost.TabSpec mapTabSpec = tabHost.newTabSpec("map");
        mapTabSpec.setIndicator("Party Map");
        mapTabSpec.setContent(mapIntent);
        tabHost.addTab(mapTabSpec);

        // Do the same for the other tabs
        Intent partyListIntent = new Intent().setClass(this, PartyListActivity.class);
        TabHost.TabSpec partyListSpec = tabHost.newTabSpec("partyList").setIndicator("Party List").setContent(partyListIntent);
        tabHost.addTab(partyListSpec);

        tabHost.setCurrentTab(1);
    }
}
Note how the content of the tabs are set to intents to execute the activity. When executed, the above will render something like:
Google Maps
Now that we have setup the above tabbed menu, we are going to try and show a map when the user selects the “Party Map” element from the menu. We will be using the Google Maps addon for this.
Registering with Google Maps
To be able to access the Google Maps data, you first need to get a Maps API Key.
Explanations of this register process can be found elsewhere. I am only going to mention the steps themselves:
1. Execute the following jdk keytool command in your Android Application Data folder:
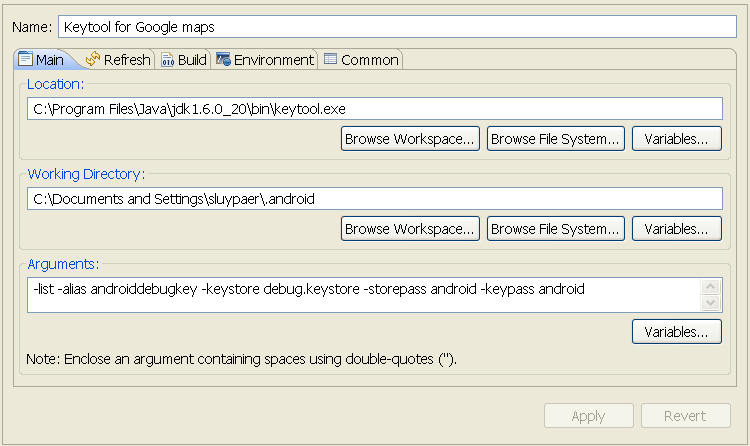
$ keytool -list -alias androiddebugkey -keystore debug.keystore -storepass android -keypass android
My external tool configuration to do this from within Eclipse looked like this:
The command prints out a certificate:
Certificate fingerprint (MD5): 94:1E:43:49:87:73:BB:E6:A6:88:D7:20:F1:8E:B5:98
2. Now, you have to go to Maps API Signup, accept the terms and conditions and enter the certificate that was printed out by your keytool command. You will be taken to a page (after an additional login to your google account if necessary) where you will be shown your Maps API Key.
The map view
In our (res/)layout folder, we now need to make the following xml file, which we will be naming mapview.xml:
<?xml version="1.0" encoding="utf-8"?>
<RelativeLayout xmlns:android="http://schemas.android.com/apk/res/android"
    android:id="@+id/maptabview"
    android:orientation="vertical"
    android:layout_width="fill_parent"
    android:layout_height="fill_parent" >
	<com.google.android.maps.MapView
		android:id="@+id/mapview"
		android:layout_width="fill_parent" android:layout_height="fill_parent"
		android:clickable="true"
		android:apiKey="-YOUR-MAP-API-KEY-"/>
</RelativeLayout>
Note that we need to insert the api key here from the previous section.
The map activity
We now reconsider the PartyMapActivity, which we left blank before. We let this class extend the Google Maps MapActivity:
public class PartyMapActivity extends MapActivity {

	private static final int MY_LATITUDE = (int) (50.883333 * 1E6);
	private static final int MY_LONGITUDE = (int) (4.7 * 1E6);

	@Override
	protected boolean isRouteDisplayed() {
		return false;
	}

	@Override
	protected void onCreate(Bundle bundle) {
		super.onCreate(bundle);
		setContentView(R.layout.mapview);

		// create a map view
		MapView mapView = (MapView) findViewById(R.id.mapview);
		mapView.setBuiltInZoomControls(true);
		mapView.setStreetView(true);
		MapController mapController = mapView.getController();
		mapController.setZoom(14); // Zoom 1 is world view

		//center the map on Leuven, the city I live in
		GeoPoint myLocation = new GeoPoint(MY_LATITUDE,MY_LONGITUDE);
		mapController.animateTo(myLocation);
	}
}
Note how we set the contentView via R.layout.mapview(e.g. the whole mapview.xml), but how we get a direct instance to the actual MapView instance through R.id.mapview. In the mapview.xml, we gave the root element in the id tag the value @+id/maptabview, while the mapview child id tag got the value @+id/mapview. Both are now reachable through R.id.maptabview and R.id.mapview.
Once we get a hold of the MapView, we set some of its display properties and we also get a handle to its MapController. We ask the MapController to point the map to Leuven, the city I live in. In the last part of this article we are going to use Android’s location services, but right now we are assuming we are located in this city.
Setting the permissions and importing the Google Maps library
Before we can take a look in the emulator at our PartyMapActivity, we first need to add some lines to our AndroidManifest.xml. Under the manifest element, before or after the application element, we should add:
<uses-permission android:name="android.permission.ACCESS_COARSE_LOCATION" />
<uses-permission android:name="android.permission.ACCESS_FINE_LOCATION" />
<uses-permission android:name="android.permission.INTERNET"/>
and under the application element we should add:
<uses-library android:name="com.google.android.maps"/>
You can now run the app. In the party map tab you should see the map zoomed in on my home city. If you see square paper without any map data instead, you probably did not get the API part right(or you lost your internet connection).
Show the user and the parties as images on the map
We are now going to show the user at its current location, and the parties nearby, as images on the map.
Adding the images to the project
Adding images to your Android project is simple. Just drag and drop a pic to your (res/)drawable folder. A reference of the image wil be added to your automatically generated R class by the ADT plugin right away.
You will need two small icons for this tutorial. One representing the user, another representing a party. For the purpose of this tutorial, you can select any you have at your disposal. For copyright reasons, I cant freely distribute the ones I used. My apologies for the crappy party pic too.
Getting the list of nearby parties
In this tutorial I will use a stub method – which should be added to the PartyMapActivity – for getting all nearby parties:
private List getPartiesNear(int latitude, int longitude){
    List parties = new ArrayList();
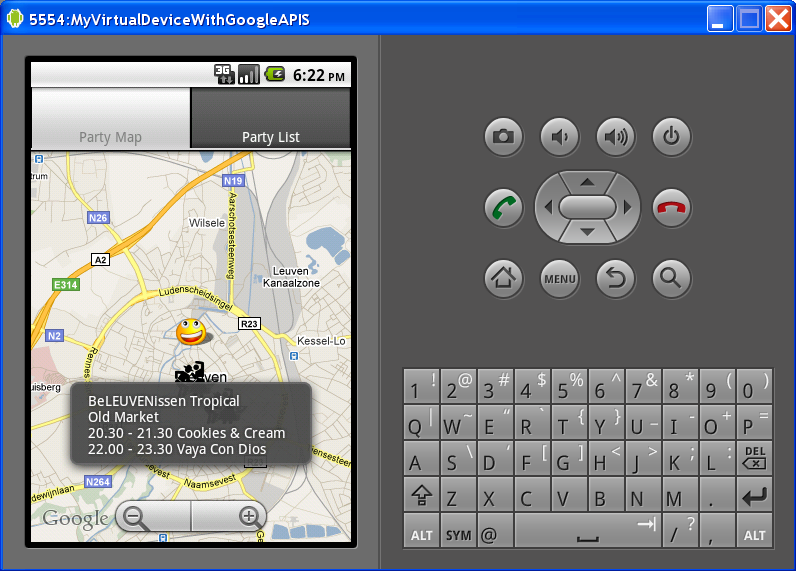
    parties.add(new Party("BeLEUVENissen TropicalnOld Marketn20.30 - 21.30 Cookies & Creamn22.00 - 23.30 Vaya Con Dios",(int) (50.878 * 1E6), (int) (4.7 * 1E6)));
    parties.add(new Party("Party 2",(int) (50.875 * 1E6), (int) (4.705 * 1E6)));
    return parties;
}
An actual implementation should probably call a web service or something, but that is outside the scope of this text.
We also give the implementation of the Party object, so you dont have to implement it yourself in case you are actually reproducing this tutorial:
public class Party {

	private String description;
	private int latitude;
	private int longitude;

	public Party(){}
	public Party(String description, int latitude, int longitude) {
		super();
		this.description = description;
		this.latitude = latitude;
		this.longitude = longitude;
	}

	public String getDescription() {
		return description;
	}
	public void setDescription(String description) {
		this.description = description;
	}
	public int getLatitude() {
		return latitude;
	}
	public void setLatitude(int latitude) {
		this.latitude = latitude;
	}
	public int getLongitude() {
		return longitude;
	}
	public void setLongitude(int longitude) {
		this.longitude = longitude;
	}

}
The Itemized overlay
To put icons over your MapView, you need to extend the abstract ItemizedOverlay class. It does not have any default implementations.
public class PartyItemizedOverlay extends ItemizedOverlay {

	private ArrayList mOverlays = new ArrayList();
	private Context context;

	public PartyItemizedOverlay(Drawable defaultMarker, Context context) {
		super(boundCenterBottom(defaultMarker));
		this.context = context;
	}

	public void addOverlay(OverlayItem overlay) {
		mOverlays.add(overlay);
		populate();
	}

	@Override
	protected OverlayItem createItem(int i) {
		return mOverlays.get(i);
	}

	@Override
	public int size() {
		return mOverlays.size();
	}

	@Override
	protected boolean onTap(int i) {
		OverlayItem overlayItem = mOverlays.get(i);
		Toast.makeText(context, overlayItem.getSnippet(), Toast.LENGTH_SHORT).show();
		return true;
	}

	public Context getContext() {
		return context;
	}
	public void setContext(Context context) {
		this.context = context;
	}

}
We also want to display a “toast” – a little rectangle with some text in – when the user clicks on one of our icons. A toast requires a Context(in this case, our PartyMapActivity will be the context), so we have to keep it with within our ItemizedOverlay.
More explanation on ItemizedOverlay would lead us too far. Note that you can read more about in in the Android Hello Mapview tutorial, on which this article is heavily based anyway.
Our PartyMapActivity revisited
In our PartyMapActivity, we know add the following after the previous last kind of code in our onCreate method:
List mapOverlays = mapView.getOverlays();

		Drawable userPic = this.getResources().getDrawable(R.drawable.user);
		PartyItemizedOverlay userPicOverlay = new PartyItemizedOverlay(userPic, this);
		OverlayItem overlayItem = new OverlayItem(myLocation, "", "/me waves");
		userPicOverlay.addOverlay(overlayItem);
		mapOverlays.add(userPicOverlay);

		Drawable partyPic = this.getResources().getDrawable(R.drawable.party);
		PartyItemizedOverlay partyPicOverlay = new PartyItemizedOverlay(partyPic, this);

		for (Party party: getPartiesNear(MY_LATITUDE, MY_LONGITUDE)){
			GeoPoint party1 = new GeoPoint(party.getLatitude(), party.getLongitude());
			OverlayItem partyOverlayItem = new OverlayItem(party1, "", party.getDescription());
			partyPicOverlay.addOverlay(partyOverlayItem);
			mapOverlays.add(partyPicOverlay);
		}
Note how the R class makes it easy to reference images in our code(my images are called user.png and party.png).
When we run our app, the user and the nearby parties are now shown on the map:
Android Location Services
The android location services enable you to pinpoint the location of the carrier(if the underlying service supports it) and present information based on that location.
The LocationManager
The central component is the LocationManager, which you do not instantiate directly, but like this:
LocationManager locationManager =
    (LocationManager) getSystemService(Context.LOCATION_SERVICE);
Doing something when the location changes
If we want to act on an update in location, we need to implement a LocationListener:
public class GeoUpdateHandler implements LocationListener {

	private MapController mapController;

	public GeoUpdateHandler(MapController mapController){
		this.mapController = mapController;
	}

	@Override
	public void onLocationChanged(Location location) {
		int lat = (int) (location.getLatitude() * 1E6);
		int lng = (int) (location.getLongitude() * 1E6);
		GeoPoint point = new GeoPoint(lat, lng);
		mapController.animateTo(point);
		//display the user pic at the new location and show the parties over there
	}

	@Override
	public void onProviderDisabled(String provider) {
	}

	@Override
	public void onProviderEnabled(String provider) {
	}

	@Override
	public void onStatusChanged(String provider, int status, Bundle extras) {
	}

}
Notice how we point the mapController to the new location in the onLocationChanged method.
Now add the following code as the last lines of the onCreate method of our PartyMapActivity, to register the LocationListener we just implemented:
LocationManager locationManager = (LocationManager) getSystemService(Context.LOCATION_SERVICE);
locationManager.requestLocationUpdates(LocationManager.GPS_PROVIDER, 0,
    0, new GeoUpdateHandler(mapController));
Emulating location change
For development, you will need to spoof the changes in location since you do not have access to a real location provider. The easiest way for me is by telnetting to the emulated device. You can see the port of the emulated device, which is probably 5554, in its window.
telnet localhost 5554
or
telnet
open localhost 5554
should do the trick. Once you have your telnet session open, you can simulate the location change with the geo command:
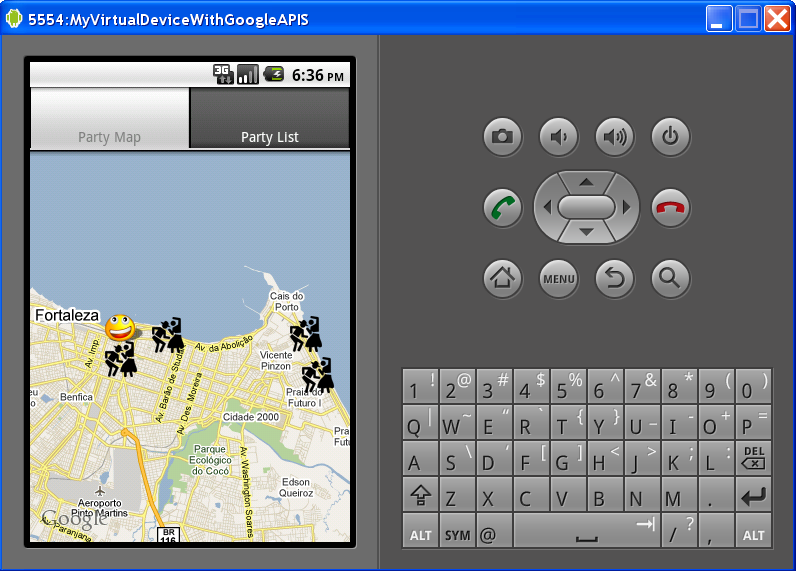
geo fix -38.525 -3.725
You will notice that our user now appears in Fortaleza in Brasil, where there are a lot of parties too:



 In this blog, Steffen Luypaert gives tutorials on how to integrate Java frameworks and third-party APIs with each other.
Hi, thanks for this excellent tutorial!!!
what is the package you put here??
Package name: package under which your code will reside.
wow. very nice tutorial. thanks!
Was this answer helpful?
LikeDislikehow to redispla user? i have problems and many errors when i try this in onLocationChanged()??
Thx for this tutorial!
Was this answer helpful?
LikeDislikeHello,
Im a student and im having trouble reproducing your tutorial.
Do you have the source code online?
Thanks,
John
Was this answer helpful?
LikeDislikeThank you very much for this tutorial
Was this answer helpful?
LikeDislikeYou can improve your application to display the location after user enter the location into textbox and press search(you produce 1 textbox and 1 button).
Was this answer helpful?
LikeDislikehi
how to develop route map between two given location.Here destination is a fixed and source as a current location then how to get route map between current location to fixed destination location.
Was this answer helpful?
LikeDislikegreat job, and nice tutorial ,sorry sir but I want to know how can I call web service in MAP Activity????????????
Was this answer helpful?
LikeDislike