Some iOS development tips
I have been doing some iOS development again lately, and in the following two posts I am going to share a few things that I have learned. This first one is going to cover some general tips.
This article is for people who played around in XCode and objectiveC already.
Tip 1: Learn to debug zombies
This section is useless to people using automatic reference counting(arc). However, there are still some reasons not to use arc, as discussed in this article on arc, and this section is aimed at the people that can not migrate just yet.
Especially when coming from a Java background where you are not used to release taken memory manually, you will make some allocation/releasing error sooner or later.
Note that when an instance is released, it becomes a zombie, and no method should be called on it anymore.
A common beginner mistake is to replace
[NSMutableArray new]
with something like
[NSMutableArray arrayWithArray: ...]
without modifying any other code for example.
When using new, the instance is not autoreleased; when using arrayWithArray, it is. You probably added a release statement companying the first statement. For the second statement you need to remove that release statement.
Unless the array is still needed later, with which the autorelease mechanism of the second statement might release it too early, requiring you to retain it, and still release it manually later.
Anyway, all of this is not too bad, but you have to learn how to track and solve these errors. By default, XCode will just make the simulator crash with a EXC_BAD_ACCESS, without giving any other information.
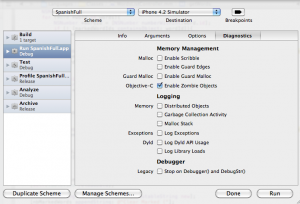
The first and most important thing to do is to press ALT-CMD-R in XCode, which will bring up the schemes screen:
Make sure you “Enable Zombie Objects” there and then run the app again. Reproduce the error. In the XCode output, a clear message will now be logged:
-[__NSArrayM release]: message sent to deallocated instance 0xc41d7e0
which is what we get if we just replace the [NSMutableArray new] with [NSMutableArray arrayWithArray:], without removing the release statement that comes somewhere after the [NSMutableArray new]. Since the second variation is autoreleased, the instance is already deallocated by the time the manual release statement on the array is called.
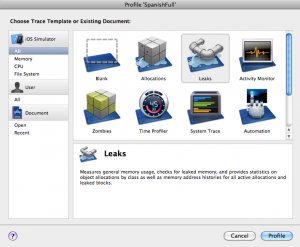
The above tells you the error type and on what object type and method the error occurred. But sometimes it is unclear why a certain instance was already deallocated. To bug these more challenging errors, you should profile the app through Product>Profile>Zombies.
When the fault occurs, the profiler blocks on the zombie object, and gives a stack of its entire lifecycle, which makes it easy to track these errors.
Tip 2: Code for both iPhone and iPad
When making an iOs app, make sure to have seperate screens for iPhone and iPad. The market for iPad apps is about as large as the one for iPhone apps, and no iPad user wants to use the default iPhone interface that puts an iPhone on his way bigger screen.
There are great tutorials out there to create a universal application. The one thing I want to add is that it is best to isolate all device dependent code in one Util class, such as:
#ifdef UI_USER_INTERFACE_IDIOM()
#define IS_IPAD() (UI_USER_INTERFACE_IDIOM() == UIUserInterfaceIdiomPad)
#else
#define IS_IPAD() (false)
#endif

#import "UiUtil.h"

@implementation UiUtil

+(NSString *) getNibNameFrom: (NSString*) nibBaseName{
    if (IS_IPAD()){
        NSMutableString *nibForiPad = [NSMutableString stringWithString: nibBaseName];
        [nibForiPad appendString:@"-iPad"];
        return nibForiPad;
    }
    else {
         return nibBaseName;
    }
}

+(NSString *) getBackgroundNameFrom: (NSString*) backgroundBaseName{
    if (IS_IPAD()){
        NSMutableString *backgroundForiPad = [NSMutableString stringWithString: backgroundBaseName];
        [backgroundForiPad replaceOccurrencesOfString:@".png" withString:@"-iPad.png" options:0 range:NSMakeRange(0, [backgroundForiPad length])];
        return backgroundForiPad;
    }
    else {
        return backgroundBaseName;
    }
}

+(CGFloat) getFontModifier{
    if (IS_IPAD()){
        return 2;
    }
    else {
        return 1.0;
    }
}

@end
The above UiUtil class isolates the code to fetch the different xibs, backgrounds and fontsizes for iPhone or iPad, without putting any “isiPad” methods in your code.
Tip 3: Find your way to the Apple Developer examples
Recently, I had to use the GameKit and SystemConfiguration APIs and I found out that Apple is making awesome examples for all the iOs frameworks available to its developers in the iOS Developer library. The code in many of these examples can be reused for like 95%.
To integrate with the Game Center for example, you just need to download the GKTapper example and you can reuse the GameCenterManager class in it for all your projects.
All that you need to do to integrate with Game Center after importing this class is calling some submitScore and submitAchievement methods on it to send the data to the Apple servers, and instantiate GKAchievementViewController or GKLeaderboardViewController to show the achievements or leaderboard(s).
Writing the Game Center integration code can be done in an hour. I actually spend more time in entering the Game Center Achievements and Leaderboards in iTunes connect than I spend writing game center related code.
Tip 4: Use third party libs
Next to the awesome Apple developer examples, there are some great third party libs available as well, that can be used commercially.
One simple but great one is iRate. It enables you to ask a user for a rating on the appstore after certain conditions are met. It is easily configurable, and just consists of the iRate.h and iRate.m file.
You only need to put the following in your AppDelegate:
[iRate sharedInstance].appStoreID = 422387255;
//[iRate sharedInstance].debug = YES;
where appId is the App Id of your app as shown in Itunes Connect. By default, the dialog in which a rating is asked is not shown until at least 5 days have passed since the app was installed, but if debug is set to YES, the dialog shows right away on app startup.


 In this blog, Steffen Luypaert gives tutorials on how to integrate Java frameworks and third-party APIs with each other.